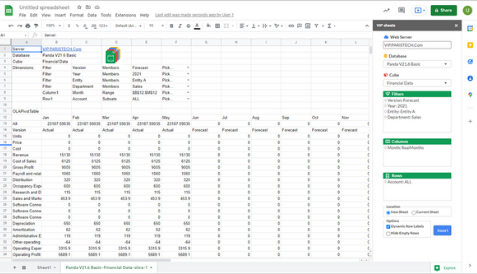
Google VIP Sheets® – Creating a Slice You Want
This documentation explains how to create the Slice you want in Google VIP Sheet ®
by changing displayed Dimension Members. This can be done using two methods: via the VIP Sheets pane (for a new or existing Slice) or the Pick Drop-down filter (for an existing Slice)
This example begins with an existing Google VIP sheet ® : the following Slice was created from the Financial Data cube in the PandA database with the following configuration:
Filter:
Version: Forecast
Year: 2021
Entity: Entity A
Department: Sales
Columns:
Month: RealMonths
Rows:
Account: ALLfil
Changing Dimensions – Using VIP Sheets Pane
Members can be changed for Dimensions in the Filter, Rows or Columns by using the VIP sheets pane at the right.
To change the display Member in a Dimension in the Filter box:
[Changing the Filter display Member for Version dimension from Forecast to Actual.]
1. Go to the VIP sheets pane (located on the right-hand side) to find the Filters section and the Dimension you wish to Change, i.e., Version.
Note that Forecast is the current display Member.
2. Double-click on the Dimension.
The Select Members dialog is displayed.
Note: There are different ways to change the display Member, via drag and drop or by using the buttons located in the upper right-hand of the window (highlighted in purple in the image below at right).
Before proceeding, note the toolbar buttons on the right
|
Icon Name |
Description |
|
Copy Selected Members |
Copies the currently selected Member/s from the Member list pane (left pane) to the display pane (right pane). |
|
Clear |
Clears/deletes all Members in the display pane |
|
Clear and Copy Selected Members |
Clears the Members in the display pane and copies the selected Members from the Member list pane (left pane) to the display pane (right pane). |
|
Invert Selection |
Inverts the selection in the display pane (right pane) |
|
Search |
Locates within the Display pane (right pane) the Member name entered into the search textbox. |
3. Change the Filter display by doing any of the following:
a. Drag and Drop: Delete the display Member on the right pane (via Clear button) then select the desired Display Member, i.e., Actual, on the Member list pane (left pane) and drag and drop to the display pane on the right.
b. Copy Selected Members icon:
Delete the display Member on the right pane (via Clear button). Next, click to select the desired display Member, i.e., Actual, on the Member list pane (left pane), then click the Copy Selected Members
c. Clear and Copy Selected Members icon:
Click to select the desired display Member, i.e., Actual, on the Member list pane (left pane) then click the Clear and Copy Selected Members
Using any of the three methods above will replace Forecast with Actual as in the following image:

4. Click the Use Selected Members icon (green checkmark at top right, circled).
Note that now in the VIP Sheets pane, Actual is now seen as the display Member for the Version

To change the display Member along the Columns/Rows:
[Changing the Column display Member to show first quarter months and Q1.]
1. Go to the VIP sheets pane (located on the right-hand side) to find Columns box and the Dimension you wish to change, i.e., Month. The subset RealMonths is the current display Member
2. Double-click on the Dimension.
The Select Members dialog is displayed.
Note: in this dialog you can use the different methods shown previously [changing display Member/s for the Filter section].

3. In the Member list pane (left pane), select the desired displayed Members (i.e., Jan, Feb, Mar and Q1) then click the Clear and Copy Selected Members.
Note that the first quarter months Members appear on the display Member (right pane).
4. Re-arrange the Members in the display pane in the desired sequence by dragging and dropping on top or under Member names.
5. Click the Use Selected Members icon (green checkmark).
Back in the VIP Sheets pane, the first quarter months and Q1 appear.
Checking the Results:
- Back in the VIP sheets pane, select New Sheet to generate and view results in a New VIP sheets Slice.
- Click the Insert button
The resulting Slice now displays data based on the new Slice configuration.


